Wiring switches
Conventional (dumb) wall switches and push-buttons can also be wired into the system — the switch only closes a contact between the input and GND; Smartive handles the rest.
Wiring
On a Smartive Server 1.2.0 or newer, wire the switch directly into the LOW VOLTAGE INPUTS terminal row:
| Switch terminal | Server terminal | Function |
|---|---|---|
| One terminal | G | GND (negative) |
| Other terminal | The selected numbered input (for example 0, 1, 2 or 3) | Input signal (I/O) |
Setup in the app
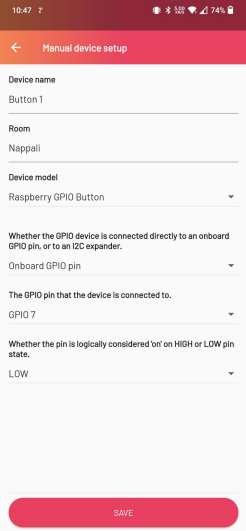
In the Smartive app, add the device as follows when adding a new device:
Selecting the device type
In the Device Model field, select the GPIO button option.
Specifying the port
If the switch is connected to the central unit, after selecting Onboard GPIO pin enter the input number the switch cable is connected to. If it is connected to an expansion module, after the I2C expander option enter the port number on the module.
Setting the signal level
Selecting the LOW option tells the system that the other end of the switch is connected to the negative pole (GND).